 |
Pages: 1, 2, 3, 4, 5 : All |
   |
|
 Author Author |
 RT M2 1191 reborn (currently 2,773 views) RT M2 1191 reborn (currently 2,773 views) |
| John_Campbell |
Posted on: June 6th, 2017, 10:15:54
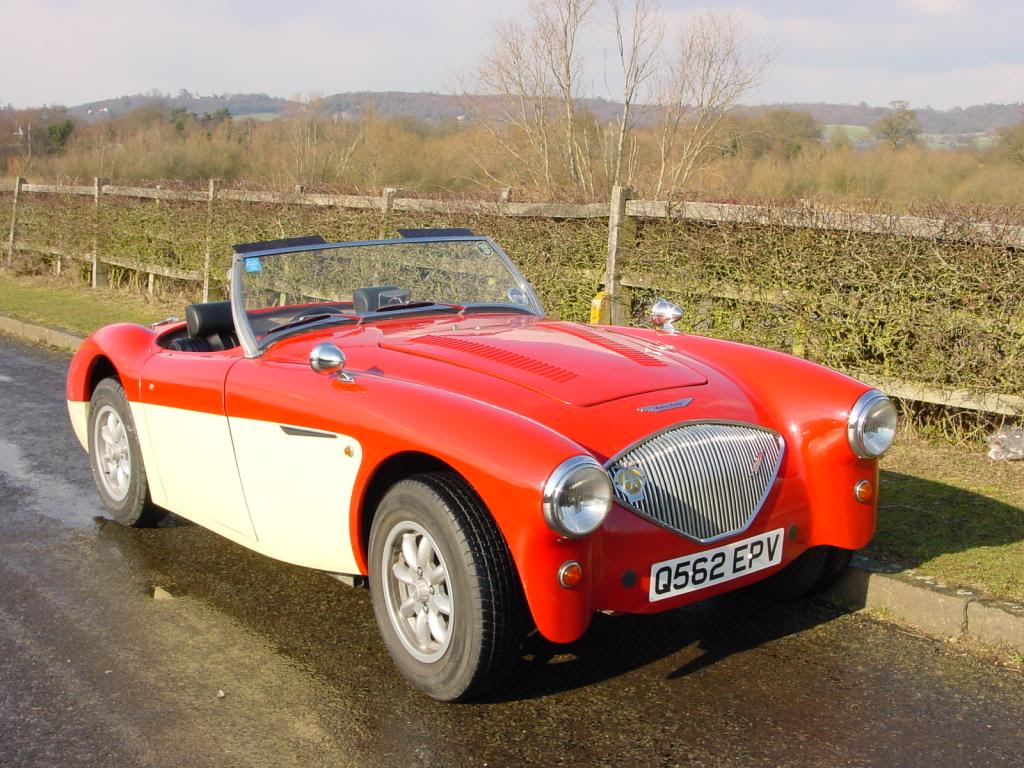
 Attachment: haldane2.jpg - 141.12 KB (5056 views) Attachment: haldane2.jpg - 141.12 KB (5056 views) |
  |
|
Minimum Member

Posts: 94
|
|
Well I thought that I owed you all a great big THANK YOU for all your support and encouragement during my 6 year project of refurbishing my brother-in-law's Jem. I will, over the coming weeks, post some details of my trials and tribulations encountered on the way.
It all started way back in the early 70's when he and I both built kit cars, which were all the rage at the time before rust prevention. He built the 1100cc Jem and I opted for a 2lt Pinto engined Healey 100 replica, a Haldane 100 (now residing in Germany I believe).
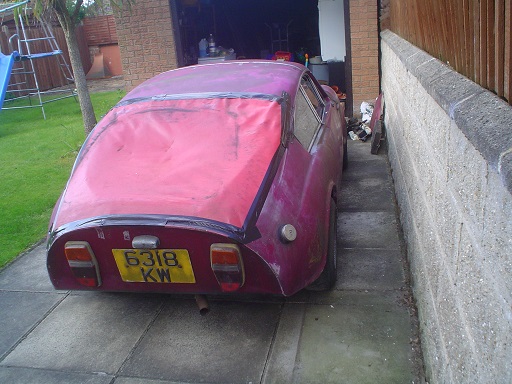
The Jem had a minor front end bump and was taken off the road for 'upgrading' and spent the next 40 years or so languishing in the drive under tarps.
Approaching retirement, I was looking for a project and asked if he'd like to see the Jem back on the road. He said "yes" and gave it to me, lock stock and barrel.
Well it's just had it's first MOT and is 99% finished (they're never 100% are they?).
I'll attach some before and after pics. |
 |
|
|
|
|
 |
| John_Campbell |
Posted on: June 6th, 2017, 10:18:06
Attachment: dsc01934.jpg - 90.29 KB (5042 views) |
|
|
Minimum Member
Posts: 94
|
|
| OOPS! that was the Haldane |
 |
|
|
|
 |
Reply: 1 - 68 |
|
|
| John_Campbell |
Posted on: June 6th, 2017, 10:19:18
Attachment: apr171.jpg - 121.83 KB (5047 views) |
|
|
Minimum Member
Posts: 94
|
|
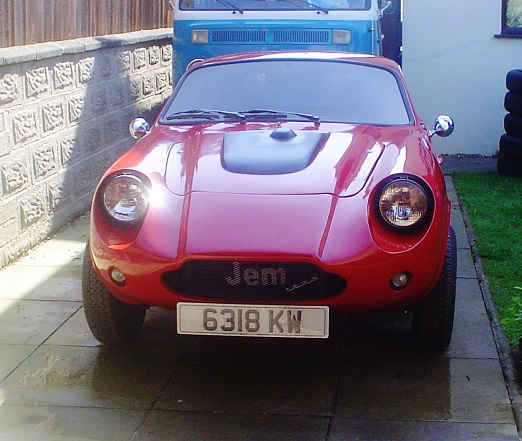
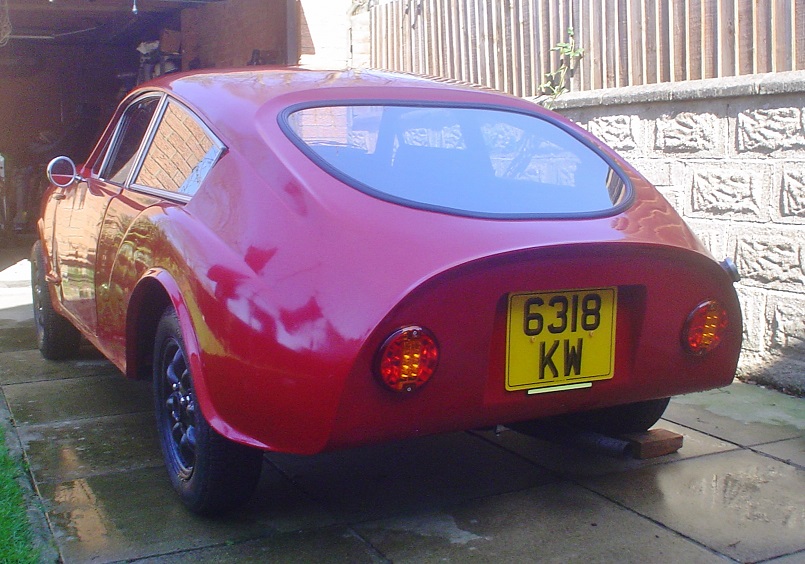
| After |
 |
|
|
|
| |
Reply: 2 - 68 |
|
|
| John_Campbell |
Posted on: June 6th, 2017, 10:19:40
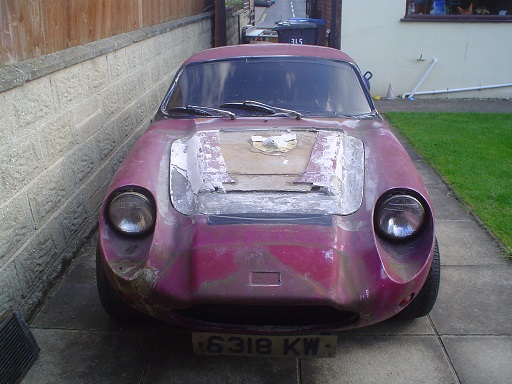
Attachment: dsc01933.jpg - 94.32 KB (5044 views) |
|
|
Minimum Member
Posts: 94
|
|
| Before |
 |
|
|
|
| |
Reply: 3 - 68 |
|
|
| John_Campbell |
Posted on: June 6th, 2017, 10:19:59
Attachment: apr173.jpg - 204.03 KB (5038 views) |
|
|
Minimum Member
Posts: 94
|
|
| After |
 |
|
|
|
| |
Reply: 4 - 68 |
|
|
| Goff_Allen |
| Posted on: June 6th, 2017, 15:43:33 |
|
|
Big Member

Location: Maltby ,South Yorkshire
Posts: 399
|
|
| Nice to see you got on the road , I like the cut out for the number plate and the back lights . |
|
|
|
| |
Reply: 5 - 68 |
|
|
| John_Campbell |
| Posted on: June 6th, 2017, 17:27:15 |
|
|
Minimum Member
Posts: 94
|
|
| Thanks Goff, the thin strip under the plate is an LED array and acts as the reverse light. I kept to the original where I could but gave in to some modern updates when tempted. I modelled the back end on a classic Alfa (can't remember its name). |
|
|
|
| |
Reply: 6 - 68 |
|
|
| John_Campbell |
| Posted on: June 6th, 2017, 17:34:24 |
|
|
Minimum Member
Posts: 94
|
|
Alfa 33 Stradale (I had to go and look it up).
Surely there's a vague similarity? (No not in price!, in looks). |
|
|
|
| |
Reply: 7 - 68 |
|
|
| John_Campbell |
Posted on: June 7th, 2017, 08:57:19
Attachment: dsc02057.jpg - 162.43 KB (5037 views) |
|
|
Minimum Member
Posts: 94
|
|
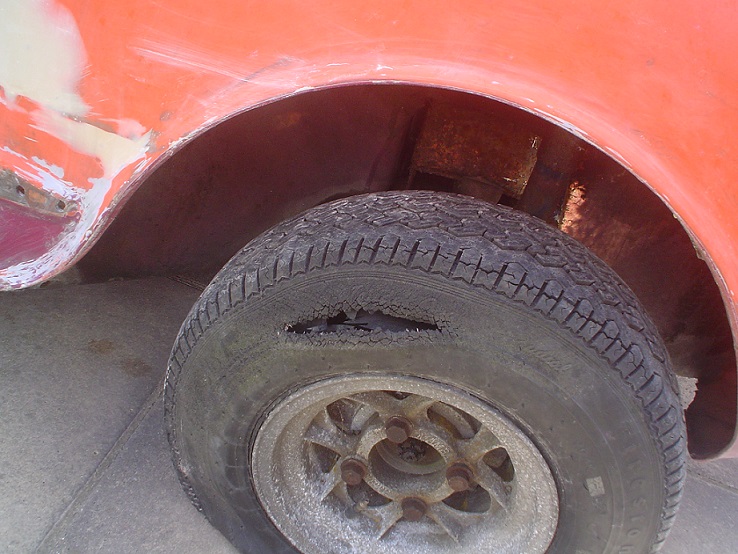
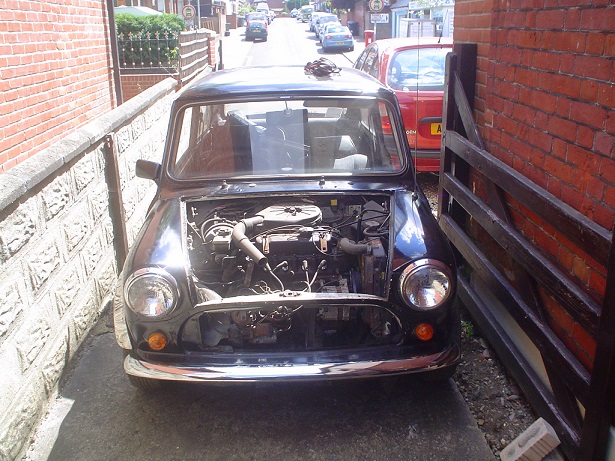
| Well the downside was I had to go up to Yorkshire to fetch it back to Norwich on a trailer. Amazingly, the ancient tyres held 20 psi and she rolled easily. However having got it home, a few weeks later, whilst sitting watching telly one evening with my wife, we heard a loud gunshot behind the house. Being a hero, I rushed out to confront the gunman to complain about the antisocial noise at that time of night, but he'd rushed off in fear at my approach. This was what I discovered the next day............. |
 |
|
|
|
| |
Reply: 8 - 68 |
|
|
| John_Campbell |
Posted on: June 7th, 2017, 09:22:16
Attachment: dsc01937.jpg - 184.17 KB (5029 views) |
|
|
Minimum Member
Posts: 94
|
|
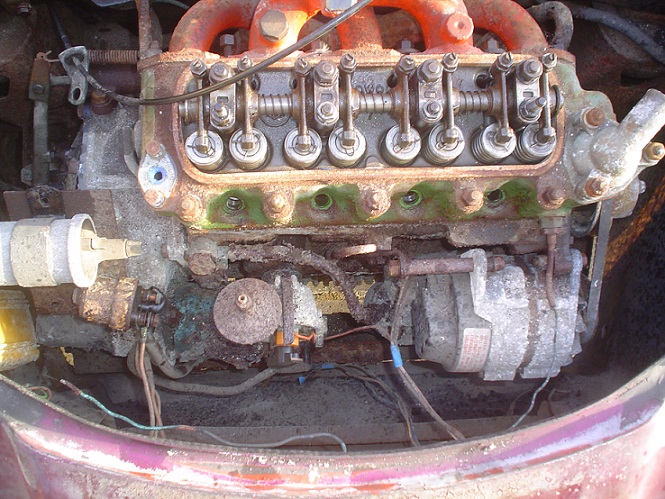
| From my earlier experience with kit cars I knew the vital question to ask myself about the standard of restoration was "How long do I expect each component to last?" i.e. where between quick bodge and showroom standard do I want to finish up? Well I decided to go the "daily driver with the odd bit of tinkering" route. I am not flush with funds and a tiny two seater project car doesn't figure highly in my accountant's (wife's) list of priorities. It was 100% complete, engine turned over fine (by hand), bit of minor front end damage, so what's the problem? So, minimal spend, over time from my monthly budget, topped up with some judicious eBay trading was the aim way back in 2011. |
 |
|
|
|
| |
Reply: 9 - 68 |
|
|
| John_Campbell |
Posted on: June 8th, 2017, 09:24:49
Attachment: dsc02000.jpg - 66.78 KB (5038 views) |
|
|
Minimum Member
Posts: 94
|
|
| Well here were my initial discoveries. Engine was OK but leaded so would need unleaded conversion (or those little bags of 'lead' balls that you dropped in your tank, remember?). Bodywork had every fibreglass problem known to man, stress cracks, breaks, holes, osmosis spots, you name it, and bodywork is my least developed skill. Interior was completely trashed but subframes looked not too bad at this stage. I wanted to keep as much of the original as possible, if for no other reason than to keep costs down, so refurbish where I could. So that was the plan. |
 |
|
|
|
| |
Reply: 10 - 68 |
|
|
| John_Campbell |
Posted on: June 8th, 2017, 09:25:50
Attachment: dsc01995.jpg - 99.29 KB (5050 views) |
|
|
Minimum Member
Posts: 94
|
|
| and more |
 |
|
|
|
| |
Reply: 11 - 68 |
|
|
| Simon Robinson |
| Posted on: June 8th, 2017, 21:04:06 |
|
|
Big Member

Location: Northampton
Posts: 338
|
|
| John - an alternative to unleaded conversion is using Castrol Valvemaster - liquid added to the tank every time you fill up. A lot cheaper than converting the head, especially if you're doing limited mileage. Costs about £12 a bottle and that will treat 250 litres of fuel. |
D&H Mk IV 8313, KGV 215V (aka George) - 75,000 miles and counting since restoration in 2011. |
|
|
|
| |
Reply: 12 - 68 |
|
|
| John_Campbell |
Posted on: June 9th, 2017, 09:04:39
Attachment: dsc02166.jpg - 156.87 KB (5032 views) |
|
|
Minimum Member
Posts: 94
|
|
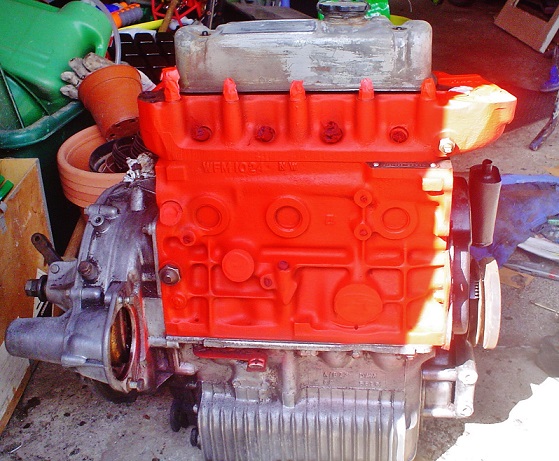
| My thoughts turned to that engine. If I strip it and recondition it and get the valve guides 'unleaded' it would probably set me back as much as getting a 2nd hand 'runner'. So my quest began. If you have no rush, on eBay, and bide your time, you can often drop on some great bargains, and so it happened for me. After many months of looking, local to me, a garage had posted a 1992 Mini Cooper 1275, 64k, MOT failure with good mechanics but dire bodywork. I posted a speculative bid and managed to win it for just £500 and got them to throw in MiniLite alloys with new tyres - result. So I now had my new donor for the kit. It ran well and selected all gears easily with the additional bonus of having all the ancillaries that had perished on the Jem. |
 |
|
|
|
| |
Reply: 13 - 68 |
|
|
| John_Campbell |
Posted on: June 9th, 2017, 09:26:37
Attachment: dsc02480.jpg - 152.19 KB (5052 views) |
|
|
Minimum Member
Posts: 94
|
|
| Moving forward a year or so and I'd sold the original 1100cc engine to a restorer in Scotland (£160), stripped the donor using what I needed and reselling the rest, getting £350 for the rolling shell from a very grateful Mini lover and topping up my Jem fund substantially. Hang on, at this rate I'll be making money out of this build, which got me thinking (what do you mean 'that's unusual'?)............ Using eBay could be a big help in funding the project, so I sold everything I could lay my hands on and made a small fortune (well more than £1000 anyway). My piece de resistance was stripping down a broken £200 GTech vacuum cleaner into its component parts and selling them for a total of £223.07. |
 |
|
|
|
| |
Reply: 14 - 68 |
|
|
| John_Campbell |
Posted on: June 10th, 2017, 10:50:25
Attachment: dsc02321.jpg - 183.29 KB (3048 views) |
|
|
Minimum Member
Posts: 94
|
|
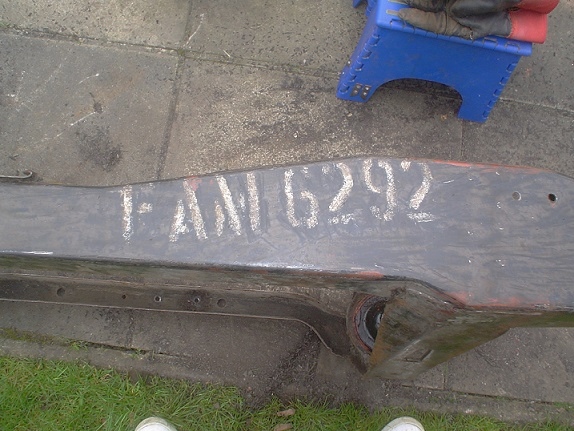
So onto the strip down which is by far the easiest bit, even with all those rusted nuts and inaccessible niches. Time to find out that I can't actually fit into a Mini Jem (the clue is in the name John) before months of bending and craning, reaching and stretching finally transform me into the lithe supple man I am today. Surprisingly, the subframes turn out to be almost pristine (good old red lead) and once the underseal came off, I discovered that the rear one was once owned by the Air Ministry, so obviously not from the original donor. MiniFins all round, again in remarkable nick, as was the tank which was still shiny inside! so most bits looked eminently reusable, Hurrah. After a few |
 |
|
|
|
| |
Reply: 15 - 68 |
|
|
| John_Campbell |
Posted on: June 10th, 2017, 10:54:14
Attachment: 123.jpg - 167.22 KB (3050 views) |
|
|
Minimum Member
Posts: 94
|
|
| Before |
 |
|
|
|
| |
Reply: 16 - 68 |
|
|
| John_Campbell |
Posted on: June 10th, 2017, 10:54:43
Attachment: dsc02335.jpg - 180.03 KB (3028 views) |
|
|
Minimum Member
Posts: 94
|
|
| After |
 |
|
|
|
| |
Reply: 17 - 68 |
|
|
| John_Campbell |
Posted on: June 13th, 2017, 09:43:21
Attachment: dsc02283.jpg - 141.26 KB (3058 views) |
|
|
Minimum Member
Posts: 94
|
|
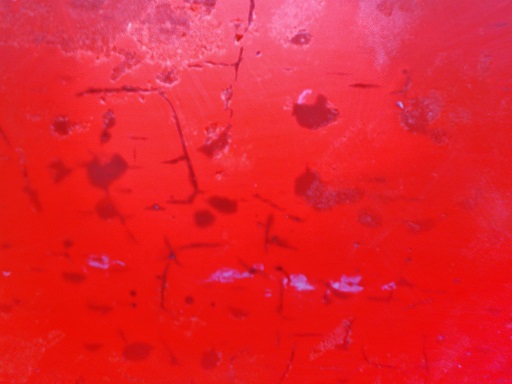
| I think I mentioned that I was rubbish at bodywork, well here's the proof. After extensive research on repair methods, you guessed it, I ignored all the good advice and did it my way (and you wonder why I'm so bad). All hairlines got ground out and filled with Isopon P40, then skimmed with P38. Proper cracks got the 'grind both sides and lay up glass' first. Osmosis was ground within a hair's breath of its life first. Then came the rubbing down. Who'd have thought it would take forever to rub down such a small car? The observant amongst you will have noticed that I didn't skim the whole car (mistake) and that creating a mirror finish with 600 grit at this stage is not conducive to getting paint to stick. Still I was still pleased with the result. Then on to paint next (lovely). |
 |
|
|
|
| |
Reply: 18 - 68 |
|
|
| John_Campbell |
Posted on: June 13th, 2017, 09:44:08
Attachment: dsc02307.jpg - 126.42 KB (3054 views) |
|
|
Minimum Member
Posts: 94
|
|
| Mid way through |
 |
|
|
|
| |
Reply: 19 - 68 |
|
|
| John_Campbell |
Posted on: June 13th, 2017, 09:44:47
Attachment: dsc02396.jpg - 151.63 KB (3049 views) |
|
|
Minimum Member
Posts: 94
|
|
| After (Hmmmmm....) |
 |
|
|
|
| |
Reply: 20 - 68 |
|
|
| John_Campbell |
Posted on: June 13th, 2017, 09:46:12
Attachment: jem_email.gif - 91.16 KB (3051 views) |
|
|
Minimum Member
Posts: 94
|
|
| All done front (see it doesn't look so bad). |
 |
|
|
|
| |
Reply: 21 - 68 |
|
|
| John_Campbell |
Posted on: June 13th, 2017, 09:53:27
Attachment: dsc02494.jpg - 69.26 KB (3056 views) |
|
|
Minimum Member
Posts: 94
|
|
And rear.
BTW I took her out on her first long run yesterday to see my 97 year old Mum up in Grimsby. Yes she fitted in and of course she loved it (after all she is my Mum). 240 miles, Norwich to Grimsby, looks like around 50+ to the gallon?? No real issues, the only minor (?) one was a slight hesitancy at the sweet spot between accelerating and decelerating. |
 |
|
|
|
| |
Reply: 22 - 68 |
|
|
| John_Campbell |
Posted on: June 13th, 2017, 11:06:02
Attachment: bonnet_top.jpg - 177.03 KB (3048 views) |
|
|
Minimum Member
Posts: 94
|
|
| Oh! I forgot all about the bonnet. I was missing the bonnet (no surprise there then) when I got the Jem so I put a plea out on this site. After a few false starts Good old Richard Porter offered me an old dusty one that he had lying around to see if I could use it. |
 |
|
|
|
| |
Reply: 23 - 68 |
|
|
| John_Campbell |
Posted on: June 13th, 2017, 11:08:33
Attachment: bonnet_strip.jpg - 162.88 KB (3033 views) |
|
|
Minimum Member
Posts: 94
|
|
| After a little (a lot actually) elbow grease, it started to look a little more presentable, of course you had to be there. |
 |
|
|
|
| |
Reply: 24 - 68 |
|
|
| John_Campbell |
Posted on: June 13th, 2017, 11:11:33
Attachment: bonnet_email.jpg - 153.09 KB (3053 views) |
|
|
Minimum Member
Posts: 94
|
|
| The problem that I could see (how could you miss it?) was that the vent in the bulge was a bit bigger than I needed. Fortunately I did have the original bulge cut from the original bonnet so I decided to do a transplant. |
 |
|
|
|
| |
Reply: 25 - 68 |
|
|
| John_Campbell |
Posted on: June 13th, 2017, 11:16:08
Attachment: bonnet2.jpg - 111.52 KB (3047 views) |
|
|
Minimum Member
Posts: 94
|
|
| Then a bright shining thing appeared at the the garage door and 'Voila!', a transformation occurred. |
 |
|
|
|
| |
Reply: 26 - 68 |
|
|
| John_Campbell |
Posted on: June 13th, 2017, 11:19:19
Attachment: dsc03054.jpg - 125.03 KB (3047 views) |
|
|
Minimum Member
Posts: 94
|
|
And if you don't believe that then look.
The observant amongst you will note that it doesn't accurately show the finished article (i.e. as it is now), but more of that later. |
 |
|
|
|
| |
Reply: 27 - 68 |
|
|
| mike brown |
| Posted on: June 13th, 2017, 16:49:58 |
|
|
Big Member

Location: Southampton
Posts: 419
|
|
Your method of repair whilst not the best will give good long lasting results. It's much worse when people use just filler or gel coat as the cracks just come back through. P40 has fibres in it so all good.
Your car looks great in just wish I had the time to start mine but alas to many other projects in the queue at the moment.
Mike |
|
|
|
| |
Reply: 28 - 68 |
|
|
| John_Campbell |
Posted on: June 14th, 2017, 09:13:22
Attachment: dsc03027.jpg - 191.81 KB (3048 views) |
|
|
Minimum Member
Posts: 94
|
|
Thanks Mike, Which of your many Jems is first?
So on to paint. Before I explain, I want you to take a deep intake of breath and make yourselves a strong coffee as this makes difficult reading for traditionalists, (but you do get the last laugh).
My other current project is a VW T2 camper, and during my research I found that 'Dubbers' (as they're called), have found a paint which a) is oil based, b) can be hand painted, c) is rust inhibiting and d) is cheap as chips, called Rustoleum. Well that suits me down to a T (especially the cheap as chips bit). It takes a bit of elbow grease but seems to give a great finish.
So buoyed with this secret out came a £35 tin of Rustoleum and a roller! |
 |
|
|
|
| |
Reply: 29 - 68 |
|
|
| John_Campbell |
Posted on: June 14th, 2017, 09:14:22
Attachment: dsc03031.jpg - 118.18 KB (3738 views) |
|
|
Minimum Member
Posts: 94
|
|
| Lots and lots of rubbing down, followed by Rustoleum Crystal Clear and more rubbing and polishing, and Hey Presto! look at what we've got. |
 |
|
|
|
| |
Reply: 30 - 68 |
|
|
| John_Campbell |
Posted on: June 14th, 2017, 09:18:09
Attachment: dsc03030.jpg - 115.39 KB (4511 views) |
|
|
Minimum Member
Posts: 94
|
|
| I couldn't have been happier with result (at this stage) normally being a plonker at bodywork I was stunned at my new found skillset, I was the man. |
 |
|
|
|
| |
Reply: 31 - 68 |
|
|
| John_Campbell |
Posted on: June 14th, 2017, 09:25:01
Attachment: dsc03029.jpg - 160.48 KB (4524 views) |
|
|
Minimum Member
Posts: 94
|
|
| I mean who couldn't be impressed by the gleaming vision that I'd created in my backyard with a roller and a tin of industrial exterior paint designed using fish oil by a fisherman who spotted that the deck under where the fish lay, never rusted. Truly awesome. |
 |
|
|
|
| |
Reply: 32 - 68 |
|
|
| John_Campbell |
Posted on: June 14th, 2017, 09:45:34
Attachment: inpaint.jpg - 137.43 KB (4546 views) |
|
|
Minimum Member
Posts: 94
|
|
| Ok OK I hear your deep intake of breath. Now for the 'I told you so' moment. Yes, from about a yard (metre for youngsters) away, it looks pretty passable, but to the observant it does sport several problems. Firstly, through no fault of mine, insect crap (why on earth do they call it honeydew? Yuk), after removal has etched through the gloss and left a matt spot (not good). The points where I'd run out of grey primer and stupidly rescued a tin of yellow from the top shelf, if you look very closely, altered the colour slightly (not too bad). Elsewhere I was too aggressive with my finishing sanding and have gone through the clearcoat in a few places (oops!). A few pinholes that I missed in my euphoria followed by many dings and scratches during its rebuild in the garage. But having said all that, for less than a hundred quid, I'm pretty pleased with the outcome. And so onto the rebuild now. Stop laughing. |
 |
|
|
|
| |
Reply: 33 - 68 |
|
|
| John_Campbell |
Posted on: June 15th, 2017, 08:11:37
Attachment: heater.jpg - 164.55 KB (4514 views) |
|
|
Minimum Member
Posts: 94
|
|
| Well now we're into my comfort zone, the rebuild. Cinquecento radiator fitted after advice from this site (thanks). In fact it's so good that I can't get the fan to come on, it doesn't get hot enough! The plumbing was one of the most onerous tasks being as all the hose dimensions are different and I wanted a heater. So as I thought (after a trial fit) that the heater was too intrusive into the footwell, I refitted the original, up behind the dash. A Landy expansion tank with the right cap fitted neatly under the bonnet. I worked on the principle of replacing all the perishables and refurbishing all the rest, replacing where necessary. This seems to have worked a treat except for one of the rear wheel bearings which I stripped, inspected, greased-up and refitted, only for it to grumble back at me on the de-bug run (its now on new rollers). |
 |
|
|
|
| |
Reply: 34 - 68 |
|
|
| John_Campbell |
Posted on: June 15th, 2017, 08:13:38
Attachment: radiator.jpg - 174.71 KB (4496 views) |
|
|
Minimum Member
Posts: 94
|
|
| Cinquecento rad |
 |
|
|
|
| |
Reply: 35 - 68 |
|
|
| John_Campbell |
Posted on: June 15th, 2017, 08:20:44
Attachment: sep15a.jpg - 149.33 KB (4497 views) |
|
|
Minimum Member
Posts: 94
|
|
| Most of this was carried out in my new custom built Japanese style garage as 'our' double garage (in length) isn't really for cars, it houses everything but. This would have to change before winter set in. |
 |
|
|
|
| |
Reply: 36 - 68 |
|
|
| John_Campbell |
Posted on: June 15th, 2017, 08:28:17
Attachment: wiring.jpg - 156.08 KB (1929 views) |
|
|
Minimum Member
Posts: 94
|
|
| Looking back, it all sounds relatively straightforward, but many of you will know how many new expletives one picks up during a Jem build. My profession was electronic engineer so I was actually looking forward to the wiring. I took the donor loom laid it out in situ, stripped off the tape, re-sited various bits, connected up, then retaped. I went through the firewall in the OS corner and ran the rear cable through the sill. Worked a treat. |
 |
|
|
|
| |
Reply: 37 - 68 |
|
|
| John_Campbell |
Posted on: June 15th, 2017, 08:47:41
Attachment: hinges.jpg - 191.34 KB (1921 views) |
|
|
Minimum Member
Posts: 94
|
|
| Oh yes, ha ha. I did try to make some front bonnet hinges. I designed, mocked up, prototyped and eventually manufactured some beauties out of ali. They didn't fit! they scraped the front of the bonnet, no matter what I did, so I came up with a novel (and far easier) method, bullets and sockets, and they work a treat. |
 |
|
|
|
| |
Reply: 38 - 68 |
|
|
| John_Campbell |
Posted on: June 15th, 2017, 08:57:15
Attachment: jcs_engine.jpg - 185.23 KB (1538 views) |
|
|
Minimum Member
Posts: 94
|
|
| So, subframes fully loaded and fitted, engine in, cooled, fuelled, oiled and powered. Electrics connected and tested, and five hard years of toil described in one sentence. And we've yet to talk about the interior consuming another year of my fast declining quota. Anyway here she is. |
 |
|
|
|
| |
Reply: 39 - 68 |
|
|
| John_Campbell |
Posted on: June 15th, 2017, 09:25:00
Attachment: jcs_engine_ns.jpg - 172.35 KB (4495 views) |
|
|
Minimum Member
Posts: 94
|
|
| Just a final word referring back to the bonnet and new found bulge. When replacing the bulge with the original, I hadn't spotted the thread on here about different bulges for different engines (oops!). Also when I got the Jem, I mistakenly assumed (never assume, John) that it had been running with the after market exhaust/inlet configuration, so when I fitted my HIF carb, yes you got it, it stuck up a mile. AND the damned thing wouldn't clear the thermostat housing or the rocker cover. That was a sad, sad day. So, added additional bulge for the carb, fitted low profile thermostat housing, fitted ali rocker cover and filed off a few fins and she just slips on nicely (good job John, nice one, your the man) Phew! |
 |
|
|
|
| |
Reply: 40 - 68 |
|
|
| John_Campbell |
Posted on: June 16th, 2017, 09:16:54
Attachment: int2.gif - 169.47 KB (4484 views) |
|
|
Minimum Member
Posts: 94
|
|
| And onto the interior. Dash first, and I went for a minimalist look being as I had virtually no space now that I had the heater installed. The factory dash had been cut out and replaced with an sheet of ali and the original dash was an additional sheet full of gauges. I set the controls centrally so I could (just) reach them. How does anyone manage to get a seating position where your head clears the roof and you can get 1st gear without leaning forward, and your knees aren't under your chin? Hah! the seats. I measured carefully, height & width (v small) and trawled eBay for some decent seats. Hurrah, I managed to get some MG TF seats with integral seat belt anchorage. What I hadn't spotted was that the roof line curves sharply down to the side. Oops, don't fit. Lucky my VW T2 needed new front seats. Next came a lovely pair of Mambas which also didn't fit the bill. Finally after examining many pics of Jem/Marcos interiors, I managed to find the smallest seats in the world and get them installed using cotter pins for quick and regular removal. |
 |
|
|
|
| |
Reply: 41 - 68 |
|
|
| John_Campbell |
Posted on: June 16th, 2017, 09:18:59
Attachment: int3.jpg - 150.62 KB (4486 views) |
|
|
Minimum Member
Posts: 94
|
|
| You can also see the demister vents here, which took a lot of judicious plastic welding to get fitted. |
 |
|
|
|
| |
Reply: 42 - 68 |
|
|
| John_Campbell |
Posted on: June 16th, 2017, 09:33:08
Attachment: int1.jpg - 181.06 KB (4488 views) |
|
|
Minimum Member
Posts: 94
|
|
| So seats in, dash in, headlining next, ha ha ha, tee hee hee, now if you want a good laugh, try sticking a floppy sheet covered in glue to a sticky roof, on your back in a box full of noxious fumes. Then after a couple of weeks redo the bits that didn't stick, then after another few weeks really get enough glue in there that it soaks into the foam and peeks through in places, Grrrrrrr. Carpets are a piece of cake after headlinings, even if the damned floor was designed to frustrate all attempts at a good finish. I decided to make a frame to cover the tyre well, battery etc. and make some trays to compensate for the lack of storage. |
 |
|
|
|
| |
Reply: 43 - 68 |
|
|
| John_Campbell |
Posted on: June 16th, 2017, 09:58:02
Attachment: studs.jpg - 102.48 KB (3735 views) |
|
|
Minimum Member
Posts: 94
|
|
| Again the observant amongst you will have noticed that I had the clutch propped open whilst all this was going on and I thought I'd mention a mod I needed with the clutch master cylinder push rod. As the master cylinder was originally sitting on the thin metal top of the Mini firewall, and we've added about 8mm of glass between the metal and the cylinder, the push rod has lost 8mm of movement. This prevented the clutch release lever from fully releasing the clutch, so I had to get 8mm welded into the push rod shaft to compensate (no pic). One last thing then for today, while I remember. I've fitted wheel spacers with extended studs (obviously) and whilst giving one that last oomph, to make sure it's tight (you know what I mean), it sheared off (damn my superhuman strength!). So I ordered a replacement, pulled the hub, fitted the stud and refitted the hub. Only then did I notice that the threads were too short. Duh!!!! I contacted the supplier and they checked stock and all were too short. he reckoned that the suppliers all used the same source so they all could be the same. And he was almost right, it took many calls and checking and explaining that I'm not an idiot and know what I'm talking about until I found a good one. So, off with the hub, out with the .................... |
 |
|
|
|
| |
Reply: 44 - 68 |
|
|
| John_Campbell |
Posted on: June 17th, 2017, 09:18:04
Attachment: jcs_engineos.jpg - 154.06 KB (762 views) |
|
|
Minimum Member
Posts: 94
|
|
| Then lastly (ha!), fit the screens, which with a bit of judicious levering and a lot of washing up liquid, went in OK. I didn't realise how vital that rear hole access was until I stuck the rear screen in and discovered that one can no longer do anything easily in the boot. So time to start that lovely 1275 which has lain silent for the last six years. Timing, fuel, spark and maybe a touch of quick-start.....GO. Pop, bang, chudder, nope, won't run. Check everything and regap the plugs (again). Same. Tweak the timing back and forward. Same. Well to cut a long story short, I'd timed the dissy 180deg out. My excuse is that it had been 40 odd years since the last time and, being arrogant, I failed to read up on it and set it with the valves fully open (duh!). Bang, first time, runs easily, Phew! OH NO! there's no oil pressure. I had to prime the oil pump through the outlet pipe at least 3 times before it eventually got on board. Success, and doesn't she sound lovely. |
 |
|
|
|
| |
Reply: 45 - 68 |
|
|
| John_Campbell |
Posted on: June 17th, 2017, 09:56:06
Attachment: dsc03407.jpg - 111.17 KB (748 views) |
|
|
Minimum Member
Posts: 94
|
|
| After the front screen went in, and after a lot of research, I found some magic adhesive that will stick a mirror to glass forever. So I did and it wasn't until I was on my test run that I found that, yes it was pointing through the rear screen, but at a point 3 yards behind the Jem. So, no way it's coming off easily so I sawed it off and then found the magic gloop doesn't stick the plastic one I'd replaced it with, so had to make an ali plate to screw the plastic onto, to then stick it on lower down, phew. I bought some bullet door mirrors and found NS one just wouldn't come round far enough to catch the inside lane but I managed to find a super little stick-on convex one to fit. What other horror did I discover? Oh yes, after a test run I noticed that the fuel in the filter was 'bubbling'?? Oh, what could possibly make highly inflammable liquid bubble? Hmmm..... The fuel line is pretty close to the aftermarket exhaust and I suspected that it was hot enough to boil the fuel! So on went some exhaust wrap (horrible, terrible stuff) and fuel line heat protection. |
 |
|
|
|
| |
Reply: 46 - 68 |
|
|
| John_Campbell |
Posted on: June 17th, 2017, 10:37:33
Attachment: marcos_site.jpg - 108.43 KB (767 views) |
|
|
Minimum Member
Posts: 94
|
|
| Well I'm running out of things to tell you (Hurray I hear you say). So onto a mishmash of stuff. I mentioned that the original firewall had been replaced at some time by an ali plate, well it resulted in a shelf at the rear of the engine which sloped back and accumulated water when wet. I initially did a pilot drain hole through to what I thought was the wheelwell, but this was actually the interior. Not good. Then in a fit of idiosyncrasy (some would say idiocy) I made a 'self-priming syphon pump' to clear the water. You may spot the white pipes either side of the rear shelf. It works using string to suck the water into a tube which feeds a smaller tube in which, as the droplets fall, creates a vacuum which pulls the water though and hey presto it start to syphon. The good thing is, it doesn't stop when the vacuum is broken, as the string continues to feed the small tube. Silly but effective. At this stage I want to thank the makers of Seriously Strong Stuff glue and Silkoflex 221 without whom I would have had to resort to some really bad practices to stick my car together (Weetabix comes to mind for those of you who still hand wash). Boo to clear silicone sealant which doesn't stick to fibreglass or paint or any man made materials that I can find. Forgive me for the various sacrilegious acts that I've committed, including, amongst others, LED lights, electronic relays, and God forbid, reversing beepers (well my neck doesn't turn like it used to). Thanks again for all your great advice and to the club for their enthusiasm and help. Any questions? |
 |
|
|
|
| |
Reply: 47 - 68 |
|
|
| Graham Bichard |
| Posted on: June 17th, 2017, 15:28:07 |
|
|
Maximum Member2


Posts: 751
|
|
Car looks lovely John!
And on the road just in time for the good weather too.
Enjoy  |
|
|
|
| |
Reply: 48 - 68 |
|
|
| Bent Larsen |
| Posted on: June 17th, 2017, 17:18:18 |
|
|
Medium Member


Location: Denmark
Posts: 126
|
|
Fine work and good to hear about problems along the way, it is usually passed over in silence.
Bent |
|
|
|
| |
Reply: 49 - 68 |
|
|
| John_Campbell |
| Posted on: June 17th, 2017, 17:40:24 |
|
|
Minimum Member
Posts: 94
|
|
| Thanks Graham, and yes Bent, we don't usually hear of the hours of heartache that I'm sure we have all experienced. Of course I did learn a lot from hearing from others about specific issues, especially on this site. |
|
|
|
| |
Reply: 50 - 68 |
|
|
| John_Campbell |
Posted on: June 19th, 2017, 09:25:18
Attachment: dsc03280.jpg - 152.22 KB (758 views) |
|
|
Minimum Member
Posts: 94
|
|
| Which reminds me of another little episode... I was lying under the engine one day (as you do) when I noticed a drip from the OS subframe rail, just below the brake pressure sensor. Well I confirmed that one of the four joints, all impossible to reach at this stage, was weeping. I must have spent half a day reaching, bending and manoeuvring to get them all nipped up. Pumped the brake...still there. After a slow cuppa, I went back and noticed that the clutch slave cylinder was wet around the dust cap Hurrah! It must be dripping onto the brake junction below. So new seals fitted and bled.... still there. Grrrrrrrrrr surely not an engine lift job? Another two cuppas later and I just happened to run my finger up the brake downpipe - wet! Ah ha, the exposed brake T piece was the culprit and took all of 10 seconds to nip up. |
 |
|
|
|
| |
Reply: 51 - 68 |
|
|
| John_Campbell |
Posted on: August 1st, 2017, 00:21:46
Attachment: dsc03415.jpg - 167.99 KB (758 views) |
|
|
Minimum Member
Posts: 94
|
|
| Spent the weekend at Old Buckenham Airshow in Norfolk and took the Jem along for its first show. It got a lot of interest and the Classic collection on the Sunday was extremely well attended. Even the 'Sally B' Flying Fortress flew over to have a look |
 |
|
|
|
| |
Reply: 52 - 68 |
|
|
| John_Campbell |
Posted on: September 4th, 2017, 16:16:56
Attachment: by_the_lake_1.jpg - 197.42 KB (752 views) |
|
|
Minimum Member
Posts: 94
|
|
| Well I took RT M2 1191 down to the Classic Cars by the Lake on Sunday, near Bury St Edmunds and it was a real eye opener. Last year they displayed 600 cars and I bet this year there were even more. Everything from pre-war originals, through Hot Rods, to brand new super cars (even a new RR). It was a great day out and the Jem garnered loads of interest and many reminiscences. I was thrown in with the rest of the unclassifiables (not with a club, Replicas?) and was the only Jem to be seen. I got a really pleasant surprise at the end when she was awarded 3rd in class, even though I didn't even know I was being judged. Result! I was most pleased because the judges recognised the amount of blood sweat and tears that go into a build, and said so. |
 |
|
|
|
| |
Reply: 53 - 68 |
|
|
| John_Campbell |
Posted on: September 4th, 2017, 16:17:38
Attachment: by_the_lake2.jpg - 186.71 KB (756 views) |
|
|
Minimum Member
Posts: 94
|
|
| Loads of Minis, this is just one club of many that attended. |
 |
|
|
|
| |
Reply: 54 - 68 |
|
|
| Gary Marlow |
| Posted on: September 4th, 2017, 17:19:27 |
|
|
Minimum Member
Posts: 86
|
|
| Looks like you were next to a Speedex Special so sort of related I suppose, (if it was a Marcos and not a Jem?). |
|
|
|
| |
Reply: 55 - 68 |
|
|
| John_Campbell |
| Posted on: September 5th, 2017, 00:02:26 |
|
|
Minimum Member
Posts: 94
|
|
| Yes and the one next to that was an aluminium bodied seven special beautifully fabricated by the owner, a really awesome build. |
|
|
|
| |
Reply: 56 - 68 |
|
|
| John_Campbell |
Posted on: September 29th, 2017, 00:02:41
Attachment: lvg775b.jpg - 140.01 KB (762 views) |
|
|
Minimum Member
Posts: 94
|
|
Talk about a car being reborn, how does one describe a change of reg.? Maybe being renamed? Well the original number is now with its ancestral home, i.e. back with my brother in law where it originated on his first car (Mini), and I've got a new (period correct) number for RT M2 1191. Anyway, thanks to Allan Brown I now have a ticket for the Mini Action day @ Castle Combe on Saturday so will be able to show off the new reg. (to anyone who's interested).
Talking about interest, I've not had a lot of response on the site for purchasing her (see my "RT M2 1191 up for grabs" post) and it would be a travesty to have to consider Ebaying her to be snapped up by someone who's not appropriate (don't ask, you know what I mean). Anyway the Mini fans at CC should be OK don't you think? |
 |
|
|
|
| |
Reply: 57 - 68 |
|
|
| John_Campbell |
Posted on: October 2nd, 2017, 13:35:40
Attachment: cc_parade.jpg - 102.24 KB (762 views) |
|
|
Minimum Member
Posts: 94
|
|
| Great day out at Castle Combe Mini Action Day on Saturday, thanks to everyone who made me feel welcome. Well another 450 mile trouble free trip under her belt and I'm beginning to manage up to three hours without a knee stretch! I've never seen so many Minis in my life, and that's saying something at my age. A long but enjoyable outing and here, on track, you can see me sliding past Des Bennet's Marcos while we tried to negotiate these pesky Mini tailenders (not really, it's the parade lap). |
 |
|
|
|
| |
Reply: 58 - 68 |
|
|
| John_Campbell |
Posted on: October 2nd, 2017, 13:46:33
Attachment: cc_2017.jpg - 108.50 KB (751 views) |
|
|
Minimum Member
Posts: 94
|
|
There was a good turnout of our members with a load of Midases, Midasi, Midasae, well more than one Midas hidden behind the campervan as well (sorry no pic). Richard, Des, Roger and Kim proudly lined up their cars alongside 1191 for a showing that attracted a lot of interest. Not enough though to get a sale on mine  |
 |
|
|
|
| |
Reply: 59 - 68 |
|
|
| John_Campbell |
|
Minimum Member
Posts: 94
|
|
| To cap it all off I returned home only to discover that 1191 had been awarded the club's 'Car of the Month'. Wow, I wasn't expecting that. So thank you to everyone who voted for her and I hope that she will keep going for another 40 years and who knows, maybe she'll get another one sometime down the line. |
 |
|
|
|
| |
Reply: 60 - 68 |
|
|
| admin |
| Posted on: October 6th, 2017, 22:18:29 |
|
|
 Administrator Administrator


Location: Maidenhead, UK
Posts: 2,377
Reputation: 1 (tot: 1) |
|
We don't have a vote for COTM but I'm always on the lookout for suitable candidates. Nominations are welcome.
The main criteria are:
1. Car in presentable condition unless it has special historical interest.
2. Car not previously selected as Car of the Month.
3. Good photo that shows off the car i.e. not in a line of cars at a show, not in garage covered with stuff, no wheelie-bins.
Action shots on circuits, hillclimbs, rallies, etc are always good to have,
4. Good mix of Marcoses and Jems over the year.
5. Recent photos and cars just completed restoration are especially welcome.
I have been known to paint a bit of grass/foliage/tarmac to cover up unwanted objects, neighbouring cars etc. |
|
|
|
 |
Reply: 61 - 68 |
|
|
| John_Campbell |
| Posted on: November 12th, 2017, 01:19:24 |
|
|
Minimum Member
Posts: 94
|
|
Well after MMC's 'Car of the Month' what else is there to strive for?
I got no positive response from the club members when she went up for sale, nor from the Castle Combe Mini crowd or our Mini enthusiasts in Japan. I then placed an AD with Car & Classic (free) and was inundated with interest which also vastly increased the views of this post as I linked it into the AD. She's now resident in France with a young Mini enthusiast who will do her proud for another 45 years.
Thanks for watching. |
|
|
|
| |
Reply: 62 - 68 |
|
|
| mike brown |
| Posted on: November 12th, 2017, 09:02:44 |
|
|
Big Member
Location: Southampton
Posts: 419
|
|
Unfortunately buyers in the UK are unwilling to pay the value of things they mostly want a bargain. I've found on several occasions now that I either end up selling stuff abroad or for a lot less than it's worth and it's really frustrating. But you will find foreign buyers are enthusiastic and will probably love it for longer and more than their British counterparts.
Mike |
|
|
|
| |
Reply: 63 - 68 |
|
|
| Neil KilBane |
| Posted on: November 12th, 2017, 13:39:38 |
|
|
Maximum Member2

just a little fine tuning left to do.
Location: Newtown Forbes, Ireland
Posts: 1,416
Reputation: 0 (tot: ) |
|
| It's the same here in Ireland, I would say that nearly every Marcos that has come up for sale in Ireland in the last 5 years has gone abroad. |
|
|
|
|
| |
Reply: 64 - 68 |
|
|
| John_Campbell |
| Posted on: March 22nd, 2018, 01:08:32 |
|
|
Minimum Member
Posts: 94
|
|
Talk about misjudgement, I sold 1191 to a guy in France who purported to be a Mini enthusiast, for £5k. But the profit monster seems to have bitten him and it's now up for sale for >16k Euro. Oh well. Sorry to the guys who contacted me after I'd promised it to him.
See the link:
https://www.carandclassic.co.uk/car/C972454 |
|
|
|
| |
Reply: 65 - 68 |
|
|
| mike brown |
| Posted on: March 22nd, 2018, 18:18:22 |
|
|
Big Member
Location: Southampton
Posts: 419
|
|
Probably the same guy who is stopping me making parts for mini Jem from the original Jem moulds. I'll say no more but you get the picture.
Mike |
|
|
|
| |
Reply: 66 - 68 |
|
|
| John_Campbell |
| Posted on: March 23rd, 2018, 15:44:08 |
|
|
Minimum Member
Posts: 94
|
|
| Well after 5 years of membership I will say goodbye and thank you all for your assistance during the rebuild of 1191. I enjoyed the resurrection and will keep my eye on the site for updates. I'm now off to join a 'dubbers' club to help with my conversion of a VW T2 Bay tintop bus into a campervan. |
|
|
|
| |
Reply: 67 - 68 |
|
|
| Pete Crudgington |
| Posted on: March 23rd, 2018, 20:21:48 |
|
|
Big Member
Location: Bath
Posts: 254
Reputation: 0 (tot: ) |
|
John
Good luck with the VDub.
Can't believe the behaviour described above by Mike and yourself.
I purchased my Jem some 22 years go as I was concerned so many of our cars were going to Japan, looks like France is now becoming the bigger issue!
Take care
Pete |
|
|
|
| |
Reply: 68 - 68 |
|
|
Pages: 1, 2, 3, 4, 5 : All |
|
|


 Mini Marcos Forum > General Boards > Mini Jem > RT M2 1191 reborn
 Logged